PID control system
Controlling a system is essential whenever it needs to full fill a relevant task as such. It's depending on the designer of the product. PID is one of the most common and perfect systems in control systems. PID gives us a rough idea about what it stands for. P for proportional, I for integral and D for derivative as such.
Let me explain the idea of what I've absorbed from working with those basic things. What I wanted to build is a line following a smart car that used two proximity sensors to identify the white line on a black surface. I was trying with several controlling methods implemented on my own, They worked properly as well but my robot was too slow. After that I got to search for a controlling method via the internet it was found the PID controlling system for me.
PID is a close loop feedback system which was full filled my requirements with a nice speedy robot.
I thought that it would be better to share with what I've grabbed from them with you as well. You will find lost of diagrams its basic theories rather than getting deep understanding. So this is it.
First of all, this will be based on Arduino but the concept can be used in whatever your using platform. When you are using PID there should be a set point. What we are going to do is our system control at that set point. There would be three conditioned,
- Under-damped - This kind of system is oscillating over a long period so it's not good for systems with rapid response.
- Over-damped - There won't be any oscillation but this needs a longer time to get to the set point.
- Critically-damped - This is what we have to use it will be set with less amount of time and it gives us the perfect outcome of the system.
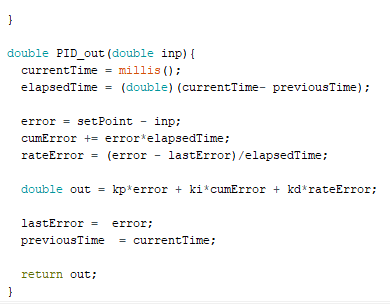
Output = Kp*(error) + Ki*(cumerror) + Kd*(rateerror)
Kp - Proportional constant
Ki - Integral constant
Kd - Derivative constant
Copy of the code:

Comments
Post a Comment